|
Size: 1299
Comment:
|
Size: 1790
Comment:
|
| Deletions are marked like this. | Additions are marked like this. |
| Line 14: | Line 14: |
|
If the Mod1 pot is mounted off board, no traces need to be cut for adding external CV. The 5V wire to the pot can be instead mounted to the switch of the CV input jack. For +/-5V signals (10VPP), 2 resistors, 6.8K and 20K, can be soldered between the jack and pot as pictured. The {{attachment:MOTM_format_mod.png}} This way nothing actually needs to be solder to the PCB and the Mod1 pot acts as an attenuator for +/-5V signals. Please take care not to exceed this voltage range. |
MICrODEC
Modularizing
The MICrODEC is a very flexible sound modulating platform. It can act as a VCO, VCA, VCF, or any sort of strange contraption you can think of. This makes it particularly handy for modular synthesizers, with the added benefit that it won't drift with temperature! Below are some modifications that can be made to the MICrODEC to incorporate it into a modular platform.
Input Attenuation
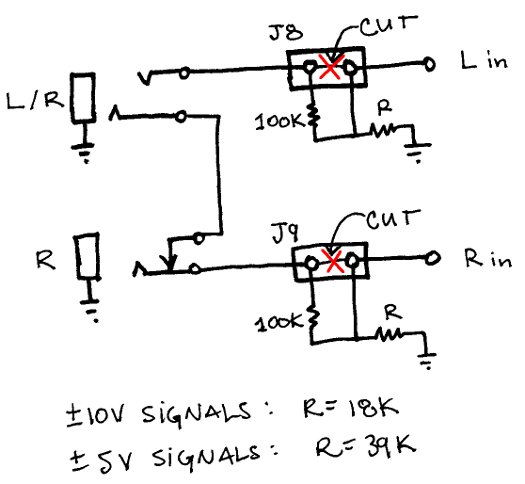
This will allow the MICrODEC to accept the higher voltages common with modular synthesizers. The schematic also shows how to split the single stereo jack into 2 jacks, one for left and right, so seperate signals can be processed. NOTE: some of the stock functions do not use the right channel.

CV input to MOD1
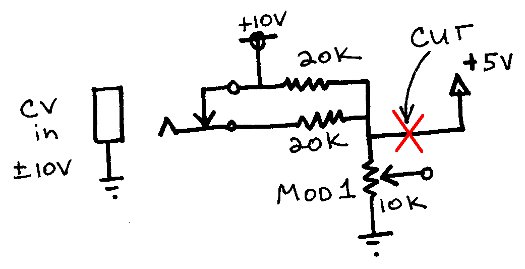
This is a quick hack to allow the MOD1 knob to be controlled by an external CV. It has the benefit of still using the MOD1 knob to control the gain of the signal you are inserting. The only drawback is that the DC level is also reduced as you turn down the gain. An op-amp circuit would be required to decouple gain and offset. The schematic is for +/-10V signals. Different resistor values would be required for different signal levels.

If the Mod1 pot is mounted off board, no traces need to be cut for adding external CV. The 5V wire to the pot can be instead mounted to the switch of the CV input jack. For +/-5V signals (10VPP), 2 resistors, 6.8K and 20K, can be soldered between the jack and pot as pictured. The
This way nothing actually needs to be solder to the PCB and the Mod1 pot acts as an attenuator for +/-5V signals. Please take care not to exceed this voltage range.
